


Welded Steel Mesh: The Versatile Workhorse for Construction & Industrial Projects
If you’ve ever hauled materials on a construction site, helped build a backyard fence, or even watched a crew patch a highway, you’ve definitely seen welded steel mesh—you just might not have called it by name. It’s that grid of steel wires or bars fused together at every crisscross, popping up in everything from concrete slabs to chicken coops. I’ve been swinging hammers and laying concrete for 12 years now, and I’d bet my toolbelt I haven’t done a single major job without it. Why? Because it’s tough, doesn’t mess around, and saves hours of hassle—three things you need when you’re staring down a deadline and the client’s breathing down your neck.
But here’s the catch: not all welded steel mesh is created equal. Grab the wrong kind for your job, and you’ll end up with concrete that cracks like a dry cookie, a fence that bends if a dog leans on it, or worst case—having to tear the whole thing out and start over. I once watched a rookie crew use light-duty mesh for a warehouse floor; six months later, the slab had gaps big enough to fit a pencil, and the client made us redo it for free. Don’t be that crew. This guide’s gonna break down everything you need to know: what welded steel mesh actually is, which type to pick for your job, where it works best, and how to install it so it doesn’t fail—no fancy engineering terms, just straight talk from someone who’s messed up and learned from it.

What Is Welded Steel Mesh, Exactly?
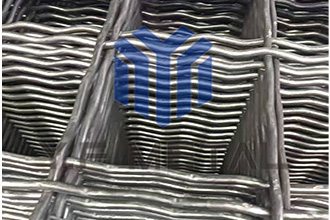
Let’s start with the basics, no fluff. Welded steel mesh (we usually just call it “welded mesh” on-site) is a grid made by welding steel wires or bars together at every crossing point. The welds aren’t just glued—they’re done with electric resistance welding, which melts the steel at the joints to make a bond that won’t break unless you hit it with a sledgehammer. Unlike woven mesh (where wires are twisted together and can stretch) or expanded metal (cut from a single sheet and prone to bending), welded mesh stays put. Once you lay it down, it’s not going anywhere.
I remember my first time using it: I was 19, fresh out of trade school, and the foreman, Joe, handed me a roll of 4×4-inch mesh for a residential patio slab. “This’ll keep the concrete from cracking when the ground freezes and thaws,” he said. I thought he was overcomplicating it—until I saw a neighbor’s patio without mesh, all cracked and heaving. That client’s patio? Still solid 10 years later, no cracks, no issues. That’s the beauty of welded mesh: it spreads weight and stress evenly, so the stuff it’s holding together (like concrete) doesn’t give out when it’s pushed.
There are two main things that make one welded mesh different from another—you gotta know these to pick the right one:
- Wire/BAR Size: This is how thick the steel is. For small jobs, like a garden fence, you might use 14-gauge wire (thin enough to bend with pliers, but strong enough for rabbits). For heavy stuff, like a bridge deck, you need 6-gauge bars—thick, stiff, and we call this “rebar mesh” because it’s basically just pre-welded rebar.
- Mesh Opening: The space between the wires or bars. Common sizes are 2×2 inches (for small slabs that need extra support), 4×4 inches (residential floors—this is our go-to), and 6×6 inches (driveways, where cars park but you don’t need super tight spacing). The smaller the opening, the more support—but it’s also heavier and costs more. I once used 2×2-inch mesh for a client’s kids’ playhouse slab; overkill, but they wanted it indestructible, so we went with it.
The Different Types of Welded Steel Mesh (And When to Use Each)
Walk into a supply store like Home Depot or a specialty construction shop, and you’ll see rows of welded mesh—labels like “10x10x6GA” or “4x4x10GA” that look like code. Don’t panic. Here’s the breakdown of the four types I use most, and exactly when to reach for each:
1. Light-Duty Welded Wire Mesh (12–18 Gauge)
This is the thin stuff—usually made from smooth or galvanized steel wire, with openings from 1/2×1/2 inches up to 4×4 inches. It’s lightweight enough that you can carry a 10-foot roll by yourself (even with a bad back, like mine), and it’s cheap—usually $15–$25 per roll. It’s great for jobs that don’t need to hold a lot of weight.
Here’s where I use it:
- Garden Fences: Keep rabbits, deer, or even neighborhood cats out of flower beds. Last spring, a client came to me begging—her vegetable garden was getting destroyed by deer. We put up 2×2-inch 16-gauge mesh around it, and she sent me a photo of her tomato plants a month later—no bites. Works every time.
- Small Concrete Slabs: Patios, sidewalks, or shed floors. A 4×4-inch 14-gauge mesh keeps these thin slabs from cracking when the ground shifts. I did a 10×10-foot patio for my cousin last summer; used light-duty mesh, and it’s still smooth as glass.
- DIY Projects: Storage racks, animal cages, or even decorative stuff. A buddy of mine used 1×1-inch 18-gauge mesh to make a modern room divider—painted it black, and it looks like something from a furniture store. Sturdy enough to hold books, too.
Heads up: Don’t use this for anything that needs to be tough. Last year, a crew tried to use 16-gauge mesh for a commercial dumpster enclosure—someone cut through it with bolt cutters in a week, and the client was furious. Stick to non-structural jobs with light-duty.
2. Medium-Duty Welded Steel Mesh (8–11 Gauge)
Step up from light-duty, this stuff uses thicker wire—8-gauge is about the thickness of a standard pencil—and it’s often galvanized or coated with PVC to keep it from rusting. Openings are usually 2×2 inches to 6×6 inches, and it’s strong enough for jobs that need a little muscle, but not full-on structural support.
My go-to uses for this:
- Residential Floors & Driveways: A 4×4-inch 10-gauge mesh is what we use for garage floors or concrete driveways. I did a driveway for a client in 2021—they park a full-size Ford F-150 on it every day, no cracks, no sinking. Perfect for regular household use.
- Residential Security Fences: 2×4-inch 9-gauge mesh with a PVC coating works great for backyard fences. It’s too thick to cut with basic bolt cutters (trust me, I’ve tried), and the PVC coating comes in colors like black or brown—so it doesn’t look like a prison fence. A client in a busy neighborhood wanted more security; we put this up, and she said she sleeps better now.
- Animal Enclosures: Chicken coops, dog runs, or even small livestock pens. I used 2×2-inch 8-gauge mesh for a client’s chicken coop—predators can’t chew through it, and the chickens can’t peck holes in it. No more missing birds, which made her happy.
Watch out for: Rust on uncoated mesh. I once used plain steel medium-duty mesh for an outdoor patio slab—within two years, the mesh started rusting, and the rust stained the concrete orange. It looked terrible, and I had to come back and patch it. Always use galvanized or PVC-coated for anything outside.
3. Heavy-Duty Welded Rebar Mesh (4–7 Gauge)
This is the big boy—made from thick steel bars (not wire) welded together, with openings from 4×4 inches to 12×12 inches. It’s heavy— a 10×20-foot sheet weighs 50+ pounds, so you’ll need two people to carry it (or a dolly, if you’re smart). It’s designed for structural jobs—concrete that has to hold a lot of weight, like warehouses or bridges.
I rely on this for:
- Commercial Floors: Warehouse slabs, retail store floors, or factory floors where forklifts or heavy machinery are used. A 6×6-inch 6-gauge rebar mesh can handle 10,000-pound lifts without breaking a sweat. I installed this in a furniture warehouse last year—they move sofas and beds around all day, and the slab’s still perfect.
- Bridge Decks & Highway Ramps: The government doesn’t mess around here—they mandate heavy-duty rebar mesh, usually 4×4-inch 4-gauge. It keeps the concrete from cracking under the weight of cars, trucks, and buses. I worked on a highway ramp outside the city in 2022; the mesh was so thick, we had to use a crane to lift it into place. You can’t cut corners here—lives depend on it.
- Concrete Walls & Foundations: Basement walls, retaining walls, or building foundations. A 6×6-inch 7-gauge mesh adds strength so these walls don’t bow or crack from soil pressure. I did a basement foundation for a client with a sloped yard—without the heavy-duty mesh, the walls would’ve caved in when we backfilled the dirt.
Pro tip: Always check local building codes before using this. Some areas have specific rules—like 4×4-inch openings for foundations, or 6-gauge bars for bridge work. I once had to redo a basement wall because the mesh openings were too big; the inspector failed it, and it cost the client an extra $2,000. Save yourself the hassle—check the codes first.
4. Specialty Welded Steel Mesh
Some jobs need mesh with extra features—like resistance to rust, fire, or weird shapes. Here are the ones I use when a regular mesh won’t cut it:
- Stainless Steel Welded Mesh: For coastal areas or jobs with chemicals (like factories or swimming pools). Saltwater and chemicals eat through regular steel, but stainless steel (usually 304 or 316 grade) doesn’t rust. I installed 2×2-inch 10-gauge stainless mesh around a beach house pool in 2023—even with salt spray every day, it still looks brand new. Worth the extra cost for coastal clients.
- PVC-Coated Welded Mesh: For jobs where looks matter (like commercial fences) or where rust is a big risk. The PVC coating comes in colors like green, brown, or black, so it blends in. I used brown PVC-coated 4×4-inch 9-gauge mesh for a park fence—looks nicer than plain steel, and it won’t rust in the rain. The park director was stoked.
- Rectangular Opening Mesh: Most mesh has square openings, but rectangular (like 2×4 inches) is better for jobs where weight is spread unevenly—like highway shoulders. The longer openings let the concrete flex a little without cracking. I used this on a highway shoulder repair last fall; the DOT inspector said it was “the cleanest job he’d seen all month.”
Why Welded Steel Mesh Beats Other Reinforcement Options
You might be thinking: “Why not just use rebar stakes or woven mesh?” I’ve tried both, and let me tell you—welded mesh is almost always the better call. Here’s why, from someone who’s done the work:
1. It Saves Time (No More Tying Rebar Until Your Fingers Hurt)
Rebar stakes work, but you have to tie them together with wire—for a big slab, that’s hours of tedious work. Welded mesh comes in pre-made sheets or rolls, so you just unroll it and lay it down. Last year, I did a 1,000-square-foot warehouse floor: with rebar, it would’ve taken 3 days to tie; with welded mesh, we finished in 6 hours. That’s a whole week cut off the project timeline—client was happy, and we got to move on to the next job faster.
2. It’s More Consistent (No Human Error Messing Things Up)
Tying rebar is messy—if someone ties a joint too loose, the rebar shifts when you pour concrete, and you end up with cracks. Welded mesh has perfect welds at every intersection. It doesn’t move, even when you dump concrete on it. I’ve never had a slab fail because of welded mesh—can’t say the same for tied rebar. This year alone, I’ve fixed three jobs where the rebar shifted; one client’s garage floor had a crack down the middle because the rebar wasn’t tied tight enough.
3. It Spreads Stress Better (No Weak Spots to Worry About)
Woven mesh stretches, and rebar stakes have gaps between them—both create weak spots where concrete can crack. Welded mesh is a solid grid, so weight and stress spread evenly across the whole surface. I tested this once (out of curiosity, not because I had to): I poured two 4×4-foot slabs—one with 4×4-inch welded mesh, one with rebar stakes spaced 6 inches apart. I dropped a 50-pound weight on both: the rebar slab cracked right down the middle; the welded mesh slab didn’t even have a scratch.
4. It’s Cheaper in the Long Run (No More Fixing Things Later)
Welded mesh costs a little more upfront than woven mesh—about $0.50 per square foot vs. $0.30. But it lasts way longer. Woven mesh stretches and tears, so you have to replace it every 5–7 years. Welded mesh? I have clients with 20-year-old welded mesh in their driveways—still going strong. The extra $0.20 per square foot saves you from redoing the job later. A client once tried to talk me into using woven mesh for their driveway to save money; three years later, they called me to fix the cracks. Cost them twice as much as if they’d used welded mesh in the first place.
How to Install Welded Steel Mesh the Right Way (Avoid Common Mistakes)
Even the best mesh fails if you install it wrong. I’ve seen crews lay mesh on the ground (no elevation), overlap sheets too little, or forget to secure it—all of which lead to cracked concrete and angry clients. Here’s my step-by-step guide, based on 12 years of making mistakes and fixing them:
Step 1: Prep the Surface (No Debris, No Uneven Ground)
First, make sure the area is clean and level. If you’re pouring a slab, rake out rocks, roots, or clumps of dirt—any unevenness will make the mesh shift when you pour concrete. I once installed mesh on a patio where the ground had a 2-inch slope; when we poured concrete, the mesh slid down to the low side, and the slab cracked on the high side. We had to break it up and start over—wasted a day of work. Fix slopes with gravel or sand—get the surface as flat as a pancake.
Step 2: Elevate the Mesh (Don’t Lay It on the Ground—Ever!)
This is the biggest mistake I see—crews lay mesh right on the dirt. When you pour concrete, the mesh needs to be in the middle of the slab (we call this the “tension zone”) to do its job. If it’s on the ground, it won’t reinforce the concrete at all. Use mesh chairs—small plastic or metal supports—to lift the mesh 2–3 inches off the ground. For heavy-duty rebar mesh, use metal chairs—plastic ones break under the weight. I use 2-inch chairs for 4-inch slabs, 3-inch chairs for 6-inch slabs. Last month, a rookie on my crew forgot the chairs; I made him go buy some and redo the mesh—better to take an extra hour than have the slab fail.
Step 3: Overlap Sheets Correctly (No Gaps—6 Inches Minimum)
If you’re using multiple sheets of mesh, overlap them by at least 6 inches. Any gap between sheets is a weak spot where concrete will crack. I once saw a crew overlap mesh by only 2 inches—six months later, the client called me because the slab had a crack right along that gap. We had to grind it out and fill it with concrete—cost them $500. Use wire ties to hold overlapping sheets together (one tie every 12 inches) so they don’t shift when you pour concrete. Pro move: Twist the ties with pliers to make sure they’re tight—loose ties mean loose mesh.
Step 4: Secure the Mesh to the Ground (No Wind or Concrete Will Move It)
Even with chairs, mesh can shift—wind can blow it around, or concrete can push it when you pour. Use stakes (galvanized steel or heavy-duty plastic) to pin the mesh to the ground—one stake every 4 feet along the edges, and one every 6 feet in the middle. For heavy-duty mesh, use metal stakes—plastic ones snap under the weight. I once had a roll of mesh blow away in a gust of wind (I forgot to stake it)—it landed in a neighbor’s yard, and we had to untangle it from their fence. Wasted an hour—don’t be that guy.